Cubietruck
This is how to install and set-up the latest Lubuntu software pack on to the NAND Flash on the Cubietruck from a Mac OS X computer.

The Cubietruck is a 5V 2A single-board computer “SBC” / PC on Board “PCB” – much like the Raspberry Pi that has taken the World with a craze - but the Cubietruck is just faster, better and stronger.. In realty Cubietruck is more like a real Mini PC.
The Cubietruck is based on the dual core Cortex-A7 (912MHz each) ARM Allwinner CPU with 2 GB Ram. Cubietruck has 8 GB onboard bootable NAND flash memory and it is expandable with a micro sdcard up to 32GB. You can connect a monitor/TV via the VGA or HDMI interface. The Cubietruck comes equipped with both Wifi and Bluetooth, Gigabit Ethernet, 2 USB 2.0, 1 Micro USB, OTG, SPDIF, IR, and Headphone. You can easily add a and fit a 2.5 inch Hard Disk Drive to the Cubietruck out the box. Power:DC5V @ 2.5A with HDD and support Li-battery & Real Time Clock “RTC”.
The Cubitruck was released for sale on the 31th. of October 2013 from http://cubieboard.org.
Supported Operative Systems:
- Android
- Fedora
- Lubuntu
- Lbuntu Server
BTW: I look forward to an Arch Linux distro for Cubietruck ( you can check here:)!
The Cubietruck comes with Android preinstalled on the NAND – and it works out the box. Cubietruck looks after a bootable OS on the Micro SDcard before it boots from the NAND flash memory.
There are 3 different ways to install and run Lubuntu on the Cubietruck:
- NAND flash
- Micro SD card
- 2.5 HHD / SSD ( or a 3.5 HHD with an external power supply )
Install
You need this in advance:
- A Mac running a newer version of OS X with access to the Internet. I am doing this from a MacBook Pro Retina running OS X version 10.9 Mavericks.
- An assembled Cubietruck with incl. cables with 2.5 HHD
- USB Power supply 5v 2/2.5A.
- An ethernet Internet connection.
NAND Installation
Get the software
Download and install the LiveSuit NAND installer in your app folder: Live Suit
Download the latest Lubuntu NAND image for Cubietruck: Cubietruck Lubuntu Desktop Releases or A20-Cubietruck Lubuntu Server Releases
Connect the mini USB to your mac (mac only).
Open LiveSuit and Select the downloaded Lubuntu NAND image (.img)
Enter FEL Mode

- Press FEL key and hold it in
- Plug in mini usb cable to the Cubietruck and wait for the prompt
- Release FEL key
Flash to Board
When you see the prompt, you have entered FEL mode. Select Yes to continue.
That’s it!
Moving Rootfs From Nandflash To Hard Drive
Prepeare the drive for rootfs
Th drive must have a primary partition formated with filesystem ext4. You can use the Linaro user interface DISK app, gparted or use the following shell commands to partition your HDD.
List all available drives:
# fdisk -l
Choose the drive you want to make changes to (e.g. sda):
# fdisk /dev/sda
Use p (print partition of a drive), d deletea partition or n (create new partition). The partition should be of type 83.
Format the partition for rootfs with EXT4 filesystem:
# mkfs.ext4 /dev/sda1
# mount /dev/sda1 /data
Copying Rootfs
Assuming that /dev/sda is the hard drive we want to install.
$ sudo su - root
# mkdir -p /tmp/nandb
# mount /dev/nandb /tmp/nandb
# (cd /tmp/nandb; tar --backup -c *) | tar -C /data -xv
Changing Boot Parameters
$ sudo su - root
# mkdir -p /tmp/nanda
# mount /dev/nanda /tmp/nanda

# vim /tmp/nanda/uEnv.txt
console=tty0
extraargs=console=ttyS0,115200 hdmi.audio=EDID:0 disp.screen0_output_mode=EDID:1280x720p50 rootwait panic=10 rootfstype=ext4 rootflags=discard

nand_root=/dev/nandb
Change the contents of uEnv.txt from nand_root=/dev/nandb to nand_root=/dev/sda1. And check the changes with cat command.
# cat /tmp/nanda/uEnv.txt
Unmount the partition.
# umount /tmp/nanda
Flush the file system buffers with sync.
# sync
# reboot
That’s it!
Configuration
Install tools and change default setting
sudo passwd root
sudo usermod -l nick linaro

$sudo apt-get update
$sudo apt-get upgrade
sudo apt-get install -y bash-completion vim tmux
sudo apt-get install -y build-essential make gcc g++ git-core x11vnc
Locale
locale-gen en_US.UTF-8
dpkg-reconfigure locales
echo "export LC_ALL=en_US.UTF-8" >> /etc/profile
Network
echo "auto eth0:1" >> /etc/network/interfaces
echo "iface eth0:1 inet static" >> /etc/network/interfaces
echo "address 192.168.2.123" >> /etc/network/interfaces
echo "netmask 255.255.255.0" >> /etc/network/interfaces
Set Time Zone/DateTime
Set time zone
sudo tzselect
Select the Asia , press Enter and choose China ,at last selet Beijing.
Copy file to /etc directory
sudo cp /usr/share/zoneinfo/Asia/Shanghai /etc/localtime
Update time
$sudo ntpdate time.windows.com
VNC
vi /etc/init/x11vnc.conf

start on login-session-start
script
    x11vnc -display :0 -auth /var/run/lightdm/root/:0 -forever -bg -rfbport 5900
end script

reboot
Set keyboard language
To be defined ….
Flashplayer
Download the flashplayerarm,type:
$ tar zxvf flashplayerarm.tar.gz
$ sudo cp libpepflashplayer.so /usr/lib/chromium-browser/plugins
$ sudo cp default /etc/chromium-browser
Wi-Fi
CB1 and CB2 do not integraed wifi chip on board ,but we can use USB WIFI. Make sure the wifi driver you use have been loaded. If not ,use
$ insmod /lib/modules/3.4.XX/kernel/drivers/net/wireless/XXX.ko
CB3(cubietruck) has Integrated wifi chip .
Type : modprobe bcmdhd to load the driver .
Add bcmdhd at the end of file /etc/modules to activate WiFi during boot. For example with Lubuntu Desktop:
# echo bcmdhd >> /etc/modules
Reboot the cubieboard .
# apt-get install linux-firmware
# reboot
Configure wifi at cubieboards and cubietruck the same way as descibed her:
$ ifconfig wlan0 up   // open the wifi ,maybe wlan1 ..
$ iwlist wlan0 scan   // scan the wifi signal
$ apt-get install wpasupplicant
$ wpa_passphrase SSID passwd >> /etc/wpa_supplicant.conf  // the SSid is name of signal want to be used
Add below configuration to /etc/network/interfaces
$ vim /etc/network/interfaces

auto wlan0
iface wlan0 inet dhcp
wpa-conf /etc/wpa_supplicant.conf
Add below configuration to /etc/resolv.conf
nameserver 8.8.8.8
Restart networking service,auto gain the IP.
$ sudo /etc/init.d/networking restart

$ ifconfig

wlan0     Link encap:Ethernet  HWaddr 98:3b:16:1e:65:62
          inet addr:192.168.1.111  Bcast:255.255.255.255  Mask:255.255.255.0
          inet6 addr: fe80::9a3b:16ff:fe1e:6562/64 Scope:Link
          UP BROADCAST RUNNING MULTICAST  MTU:1500  Metric:1
          RX packets:367 errors:0 dropped:0 overruns:0 frame:0
          TX packets:129 errors:0 dropped:0 overruns:0 carrier:0
          collisions:0 txqueuelen:1000
          RX bytes:28505 (28.5 KB)  TX bytes:20113 (20.1 KB)
AP Mode
希望 Cubietruck 成为一台 AP 来为其他无线设备提供网络
# modprobe bcmdhd op_mode=2
那么首先安装一下 hostapd(一个 IEEE 802.11 AP 和 IEEE 802.1X/WPA/WPA2/EAP/RADIUS 验证器)
这里需要注意的是默认软件源上的 hostapd 不能较好的工作, 我们先下载一个编译好的最新版,相关讨论详见,
当然也可以自己编译。下载完 hostapd 可以拷贝到 /usr/sbin 中。
我这里把 hostapd 的配置文件放在 /etc/hostapd/hostapd.conf 中,
详细配置如下: 参考:http://wireless.kernel.org/en/users/Documentation/hostapd
interface=wlan0
driver=nl80211
ssid=__cubietruck__
channel=1
hw_mode=g
macaddr_acl=0
auth_algs=1
ignore_broadcast_ssid=0
wpa=2
wpa_passphrase=12345678
wpa_key_mgmt=WPA-PSK
wpa_pairwise=TKIP
rsn_pairwise=CCMP
以上是最基本的配置,
这里聊聊 channel 更详细的分析请参考。对于 channel 来说,有两点需要注意:
- 避免竞争(contended)。假定有多台路由器,它们都在一个 channel 上,那么意味着会出现竞争,但是不存在干扰,传输能够有序的进行
-
避免干扰(interfering)。
首先要明确的是,我们选择了某个 channel,例如 channel 6,
这不意味着通讯仅在 channel 6 上进行,实际上通讯会横跨 5 个 channel(相邻的,channel 4 ~ channel 8,20MHz 的 channel 带宽)。
现在两个路由器,一个在 channel 6 上(channel 4 ~ channel 8),一个在 channel 7 上(channel 5 ~ channel 9),
那么干扰就会出现(它们无法管好自己进行有序的通讯)。需要注意的是,干扰会比竞争带来更多的问题
如果你周围没有什么无线设备,那么可以轻易的选择一个合适的 channel(例如 channel 6),而且还可以使用 40MHz 的 channel 带宽。但是实际的情况往往并非这样,我们需要考虑到干扰的问题。channel 6 通常是被最频繁使用的 channel,按上所述,channel 11 就是下一个很合适的 channel(除了 channel 11 以外 channel 1 也是很不错的)。顺带说一下的是,虽然使用 40MHz 的 channel 带宽能传输更多的数据(更快的 WiFi 速度),但是 40MHz 意味着通讯横跨 7 个 channel,也就是说严重的干扰可能发生,所以说更大的带宽不意味着更高效的数据传输。
接着聊聊验证和加密,这里我选用 wpa2,这是因为 wep 不安全,所以也只能选择 wpa 或 wpa2,而最安全的就是使用 wpa2。 还有一些设置没有详细介绍,如果你不满足可以参考一下其他资料。
现在可以在 /etc/rc.local 中加入以下代码来在开机时打开 WiFi:
hostapd -B /etc/hostapd/hostapd.conf
到这里,应该可以看到一个 SSID 为 cubietruck 的 AP,可以尝试用密码 12345678 连接上去。 目前的情况是 Cubietruck 可以通过有线连接互联网,WiFi 可以被其他设备连接,那么其他无线设备如何通过连接 Cubietruck 的 WiFi 来访问互联网呢?有几种办法:
- 创建一个新的 IP 子网
- 桥接
这里我使用桥接的方式,首先安装 bridge-utils:
# apt-get install bridge-utils
修改 /etc/network/interfaces:
# loopback
auto lo
iface lo inet loopback

# bridge
iface eth0 inet manual
iface wlan0 inet manual
auto br0
iface br0 inet static
    bridge_ports eth0 wlan0
    address 192.168.1.150
    netmask 255.255.255.0
    gateway 192.168.1.1
这里将 eth0 和 wlan0 桥接在一起,Cubietruck 使用的是静态 IP 192.168.1.150(这样内网访问比较方便),当然你也可以调整一下配置来使用路由器动态分配的 IP:
auto br0
iface br0 inet dhcp
bridge_ports eth0 wlan0
最后,在稍微编辑一下 hostapd 的配置文件 /etc/hostapd/hostapd.conf,在其中加入:
bridge=br0
现在连接上 Cubietruck 的 WiFi 就可以上网啦。
Setting CPU Frequency
Cubieboard CPU frequency can be adjusted in real time, , the following file save as shell file, or placed in /etc/rc.local before the exit 0 can be executed. Specific CPU frequency maximum and minimum values can be set based on usage .
#!/bin/sh
echo ondemand > /sys/devices/system/cpu/cpu0/cpufreq/scaling_governor
echo 1000000 > /sys/devices/system/cpu/cpu0/cpufreq/scaling_max_freq
echo 600000 > /sys/devices/system/cpu/cpu0/cpufreq/scaling_min_freq
echo 25 > /sys/devices/system/cpu/cpufreq/ondemand/up_threshold
echo 10 > /sys/devices/system/cpu/cpufreq/ondemand/sampling_down_factor
After testing, Cubieboard single core version (A10) CPU frequency can be overclocked to 1.2GHz, stable operation (would be better to stick a CPU heatsink); Cubieboard dual-core version (A20) can also be overclocked to 1.2GHz
NAND
现在我们查看一下 nandflash:
$ ls /dev/nand* -l
brw-rw---- 1 root disk 93, 0 Jan  1  2010 /dev/nand
brw-rw---- 1 root disk 93, 1 Jan  1  2010 /dev/nanda
brw-rw---- 1 root disk 93, 2 Jan  1  2010 /dev/nandb
brw-rw---- 1 root disk 93, 3 Jan  1  2010 /dev/nandc
这里的 nand 表示了整个 nandflash,nanda、nandb、nandc 则为其 3 个分区,其中:
- nanda 中包含 bootlogo、script.bin、uEnv.txt 等
- nandb 中为 rootfs
- nandc 有 5G 左右的空间,
我觉得把它合并到 nandb 似乎是一个好的想法。敲击命令 nand-part 大概能看到如下信息(只列出主要部分):
partition  1: class =         DISK, name =   bootloader, partition start =    32768, partition size =   131072 user_type=0
partition  2: class =         DISK, name =       rootfs, partition start =   163840, partition size =  4194304 user_type=0
partition  3: class =         DISK, name =        UDISK, partition start =  4358144, partition size = 10584064 user_type=0
我们可以看到各个分区的大小,这样我们就可以重新规划一下:
# nand-part -f a20 /dev/nand 32768 'bootloader 131072' 'rootfs 14778368'
此命令执行后输出:
ready to write new partition tables:
mbr: version 0x00000200, magic softw411
2 partitions
partition  1: class =         DISK, name =   bootloader, partition start =    32768, partition size =   131072 user_type=0
partition  2: class =         DISK, name =       rootfs, partition start =   163840, partition size = 14778368 user_type=0
我们看到 bootloader(nanda)的大小未发生变化,rootfs(nandb)和 UDISK(nandc)合并了(4194304 + 10584064 = 14778368)。
然后,我们重启一下系统,再敲击命令来完成 nandb 的扩展:
# resize2fs /dev/nandb
需要说明的是,这个重分区的过程不会破坏任何数据的。
Developing
Using serial debug port
The tutorial how to use TTL cable: http://linux-sunxi.org/Cubieboard/TTL
Install the tool name minicom in your computer:
$ sudo apt-get install minicom
Set the minicom configuratiaon, TTL and cubieboard are connected ,then minicomin the terminal ,enter into the console.
Installing target Toolchains
$ sudo apt-get install vim build-essential git libusb-1.0-0-dev pkg-config -y
Hardware Testing
The best way to test hardware is install the office firmware from http://dl.cubieboard.org and usr office fitting from http://docs.cubieboard.org/addons,which can find the problem quickly you met. Of course ,you should save the data before reinstall firmware.
LEDs On Cubieboaed
These are blue LED1 meaning heartbeat and green LED2 on cb1 and cb2. LED1 - GPIO port PH21, LED2 - GPIO port PH20. These are LED1~4 on cb3(cubietruck). LED1 - PH21, LED2 - PH20,LED3 - PH11,LED4 - PH07.Refer to FAQ about cubietruck For cb1 and cb2:
$ echo 1 > /sys/class/gpio/export   //open the PH20
$ echo 2 > /sys/class/gpio/export   //open the PH21
The directories /sys/class/gpio/gpio1_PH20 and /sys/class/gpio/gpio2_PH21 had been create .
$ cd /sys/class/gpio/gpio1_PH20
$ echo out > direction    //set PH20 as output
$ echo 1 > value          //set PH20 as high ,grenn LED is light
$ echo 0 > value          //set PH20 as low,turn off the LED
Turn off led.
ls /sys/class/leds/*/brightness | xargs -i -n1 echo "echo 0 > {}" | sh
HDMI
It would be best way connect the HDMI cable before power on the cubieboard,becuse some cable maybe appear the promble of sequence in time. If your have not full screen display, you can try the following commands
$ fbset -left 10
1.If you are using lubuntu, try the following commands
$ wget http://dl.cubieboard.org/software/tools/armhf/cb-display-tool
$ chmod 777 cb-display-tool
$ cb-display-tool -o 8 -m 11  //switch to VGA type
$ cb-display-tool -o 4 -m 4  //switch to HDMI type
If you switch to other resolution, you need to restart your X after the modification
2.The default display configuration in script.bin of uboot partition of official desktop-firmware as :
;disp init configuration
;
;disp_mode            (0:screen0<screen0,fb0> 1:screen1<screen1,fb0> 2:two_diff_screen_diff_contents<screen0,screen1,fb0,fb1>
;                      3:two_same_screen_diff_contets<screen0,screen1,fb0> 4:two_diff_screen_same_contents<screen0,screen1,fb0>)
;screenx_output_type  (0:none; 1:lcd; 2:tv; 3:hdmi; 4:vga)
;screenx_output_mode  (used for tv/hdmi output, 0:480i 1:576i 2:480p 3:576p 4:720p50 5:720p60 6:1080i50 7:1080i60 8:1080p24 9:1080p50 10:1080p60 11:pal 14:ntsc)
;screenx_output_mode  (used for vga output, 0:1680*1050 1:1440*900 2:1360*768 3:1280*1024 4:1024*768 5:800*600 6:640*480 10:1920*1080 11:1280*720)
;fbx format           (4:RGB655 5:RGB565 6:RGB556 7:ARGB1555 8:RGBA5551 9:RGB888 10:ARGB8888 12:ARGB4444)
;fbx pixel sequence   (0:ARGB 1:BGRA 2:ABGR 3:RGBA) --- 0 for linux, 2 for android
;lcd0_bright          (lcd0 init bright,the range:[0,256],default:197
;lcd1_bright          (lcd1 init bright,the range:[0,256],default:197

[disp_init]
disp_init_enable = 1
disp_mode = 0
screen0_output_type = 3
screen0_output_mode = 4
screen1_output_type = 0
screen1_output_mode = 4
fb0_width = 1024
fb0_height = 768
fb0_framebuffer_num = 2
fb0_format = 10
fb0_pixel_sequence = 0
fb0_scaler_mode_enable = 0
fb1_width = 1024
fb1_height = 768
fb1_framebuffer_num = 2
fb1_format = 10
fb1_pixel_sequence = 0
fb1_scaler_mode_enable = 0
Modify the parameter according to the using HDMI displayer . You can get more information about display from Display and modify script.bin from edit_the_system_configuration
VGA
Refer to HDMI section.
USB Host
The quickly way to test the interface of USB is plug the U disk . The system will identify the U disk .Use fdisk -l can see its information which meaning the interface of USB is working.
IR
IR had beed add into the kernel .If not, use command to load the moudle:
$ insmod /lib/modules/3.4.X/kernel/drivers/input/keyboard/sun4i-ir.ko
$ sudo cat /dev/input/event0 | hexdump
Press the key of IR remote control,the terminal will print the message as:
0000000 8415 525f 50cf 0003 0001 0094 0001 0000
0000010 8415 525f 50db 0003 0000 0000 0000 0000
0000020 8415 525f 22f7 0007 0001 0094 0000 0000
0000030 8415 525f 22ff 0007 0000 0000 0000 0000
The digital 0094 is keycode of the remote control .
Headphone Jack
There are two audio devices HDMI and headphone in the cubieboard.
$ sudo alsamixer
There are two audio devices named sunxi-sndhdmi and sunxi-CODEC in the system. The sound output is send out from HDMI by default . You can adjust volume and other configuration ,use Ctrl-Z to save it.
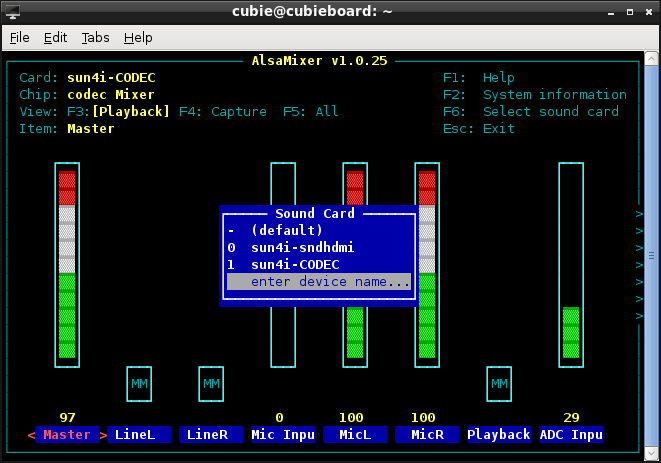
To set sound care being sunxi-CODEC modify /etc/asound.conf to turn on the headphone.
pcm.!default {
    type hw
    card 0    //If you want to set HDMI as output ,turn 0 to 1.
    device 0
}
ctl.!default {
    type hw
    card 0   //If you want to set HDMI as output ,turn 0 to 1.
}
If Plug in the headphone and type:
$ speaker-test -twav -c2
The sound “sound left,sound right,sound left” will output from headphone.
Let cubieboard speak by package named espeak :
$ sudo apt-get install espeak
$ espeak "hello"             //say: hello
$ espeak "hello cubieboard"  //say: hello cubieboard
Camera
Most of the camera driver has integrated in the kernel,so it is available insert usb-camera into the cubieboard.
$ sudo apt-get install luvcview
$ luvcview -s 1080x720 (can modify the resolution)
References:
Cubieforum for Q\&A’s LUbuntu website .
LiveSuit Guide cubieboard.org Tutorials for Cubietruck cubieboard.org
FAQ specs and faq’s cubieboard.org
A20-Cubietruck specs from SUNXI
Cubieboard3: Cubietruck is all ready with links software etc.
Moving Rootfs From Nandflash To Hard Drive cubieboard.org